Tips for using the Mamiya 6 Medium Format Rangefinder
I’ve had my Mamiya 6 medium format rangefinder for over four years at this point. The image quality, ergonomics, and portability (for a medium format camera) are unmatched and it’s one of my favorite cameras. Now, this is not a camera review – there are already plenty of those – but if you’re seriously considering purchasing a Mamiya 6 or already own one and want to get the most out of it, this guide is for you.
Here’s what I’ve learned about the Mamiya 6 after years of real-world use:
Getting Started
The Rangefinder
The rangefinder in this camera, like many other high-end rangefinders, moves the lines as you focus to try and align the frame more accurately to what you’ll see on the negative. I found this to be pretty accurate in the real world, and you shouldn’t need to overcompensate when focusing closely.
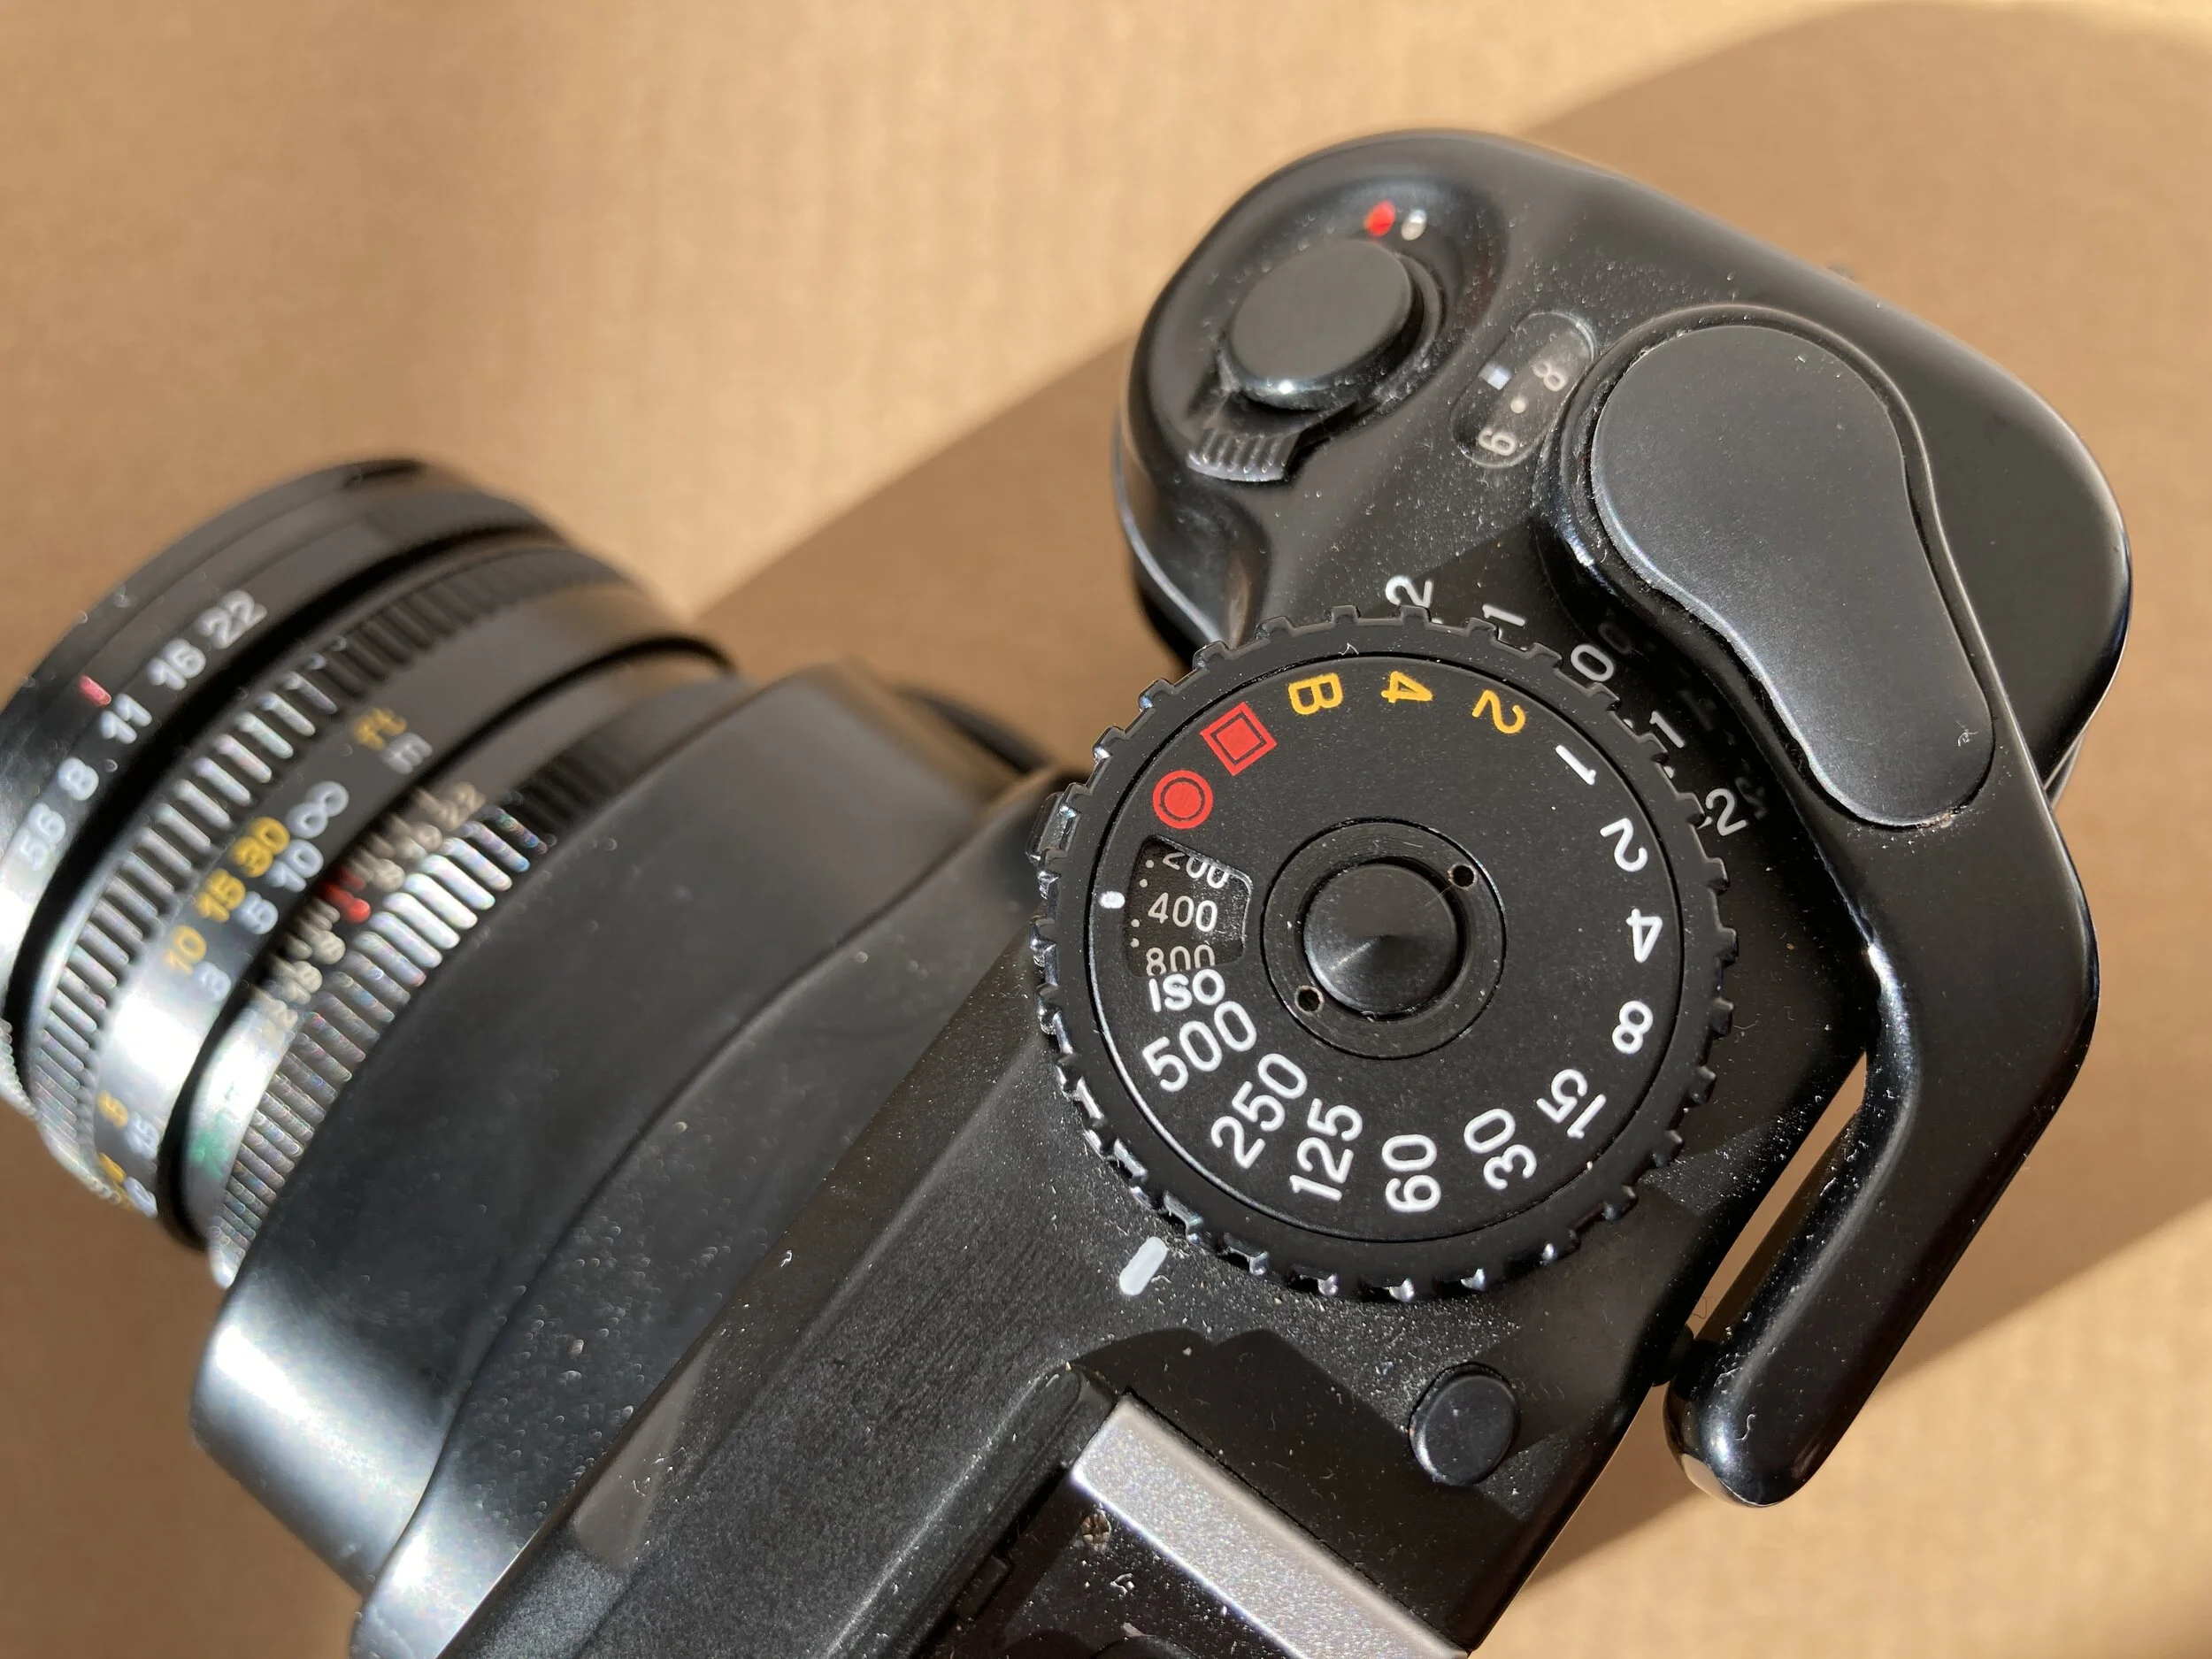
The ISO Dial
Don’t mistake the dots for signifying the ISO - the dot above 400 does not mean 400, it means 320 (a third of a stop). Set it to the number itself, as it has a stop there - it’s just not abundantly clear from the first glance. If you like to overexpose your film by a stop don’t do it with the ISO dial; rather, leave your exposure compensation dial up a stop. For me, this is pretty much permanently set to +1EV.
Though this may sound obvious, there’s another reason for setting the ISO to box speed and using exposure compensation: most medium format cameras do not have a window to see the film you’re using like you would on a 35mm camera. If you leave a roll half-shot and come back to it in a month, you’ll be better able to tell what that roll is if the ISO is set correctly. Otherwise, you may not know if you’re shooting a 200 ISO black and white film or a 400 speed color negative film. Now of course there’s a small slot where you can stick a piece of paper of a tear-off from your film cardboard box, but often these fall out so I don’t rely on it.
The (protective) shutter curtain
The camera uses a leaf shutter, but there’s a second shutter you can manually use. This is a traditional cloth shutter, and the dial under the camera can put it in place. I always use this when I reload so that dust does not settle on the lens or the bellows. It’s one thing to clean a lens, but it’s a whole different thing to have dusty or degraded bellows.
The protective shutter curtain on the Mamiya 6 is also required to change lenses. So if you can’t remove a lens, ensure that the cloth shutter is on. This is designed so that the film does not get exposed to the light. Of course, release the cloth shutter before you take a picture, otherwise you won’t be able to release the real shutter.
120/220 Film
The Mamiya 6 can shoot both 120 and 220 medium format film, but you must rotate the pressure plate on the inside of the film door. I don’t typically shoot 220, but if you mix formats, always set it appropriately before you close the door. The setting on the pressure plate tells the camera when to stop shooting and finish the roll (which is frame 12 on a roll of 120 film).
The camera strap mounts
The camera lets you pick how you want to carry it on a strap: horizontally, like a traditional camera, or vertically. I don’t carry it vertically, nor have I ever found a reason to. What happens is that the camera tends to bounce around more, since there’s more unsupported mass when carried vertically. The last thing an old film camera that’s long out-of-manufacture needs is to be bounced around more. Speaking of which, I’ve heard that the only place to get a Mamiya repaired these days is Precision Camera Works. I’ve also heard that their backlog is intense – months long, and to the point that they’ve had to stop accepting certain cameras for repair as of March 2021.

Twentynine Palms, CA. Taken with the Mamiya 6 and Kodak Portra 160 film.
The Shooting Process
The unfortunate result of shooting without the bellows fully extended and locked on the Mamiya 6, which happens more than you’d think when you’re new to the camera.
The Process
If you shoot film, you’re already well-aware that there are strict processes that need to be followed in order to ensure the film isn’t degraded. If you develop at home, you might already have processes to unload film and mix chemistry without cross-contamination. With the Mamiya 6 being not only a rangefinder, but a camera that requires both extension, an on-off switch, and the opening of the protective shutter curtain (if it’s not already) before shooting, there are many areas to go wrong.
The camera will desperately try to warn you that the lens cap is on with blinking LEDs in the viewfinder, but it won’t prevent you from shooting. Same with the bellows extension.
I guarantee there will be a time that you fire off a shot with the camera without extending the bellows, and if you haven’t used a rangefinder, that you’ll see a couple blank shots due to the lens cap being on – particularly if it’s in a high-stress shooting situation like streets or portraiture where you don’t have time to think. It’s absolutely happened to me. The way to combat mistakes is to create a process that’s followed every single time without fail. (This is also known as a heuristic). Here’s a look at my process:
When the camera is not in my hand actively shooting, it is in “stored” condition. In the stored condition:
the bellows is retracted,
the lens cap is on, and
the camera is set to off.
The protective curtain is always open unless actively reloading film or changing lenses.
When the camera is being moved from stored position to active position, I first extend the bellows until it clicks. I give it a wiggle to ensure it’s rigid and not going to move. This confirms that the camera bellows are locked and ready to shoot.
In the same motion, the lens cap is removed and put in one of my pockets. This two-part approach ensures that the most common mistakes are solved.
The camera is then brought to my eye and turned on. Then I meter and shoot as normal.
From here we can branch out: if I’m walking around or hiking and shooting, the camera stays in active condition. If I’m shooting intermittently, such as driving and shooting frames every now-and-then when I pull off or storing the camera in a bag, the camera will be in stored condition. I’ll reverse the process: lens cap on, bellows retracted, and camera off all at the same time.
Following this process every time means that any time I see the lens fully extended, I know that the lens cap is off and I’m ready to shoot. Conversely, any time that I see the lens cap on, I know that the bellows is retracted and I’m not ready to shoot. The goal is to ensure that there is no point of failure, where if I’m in a high-stakes shoot and can’t always remember to manually check the lens cap, I avoid the possibility of blank or out-of-focus frames.
I know it sounds a little excessive, but this truly isn’t a camera where the on-switch means fire, like a point and shoot. It’s far closer to a large format camera in which every step is manual and you’re fully to blame for whether the image comes out or not.
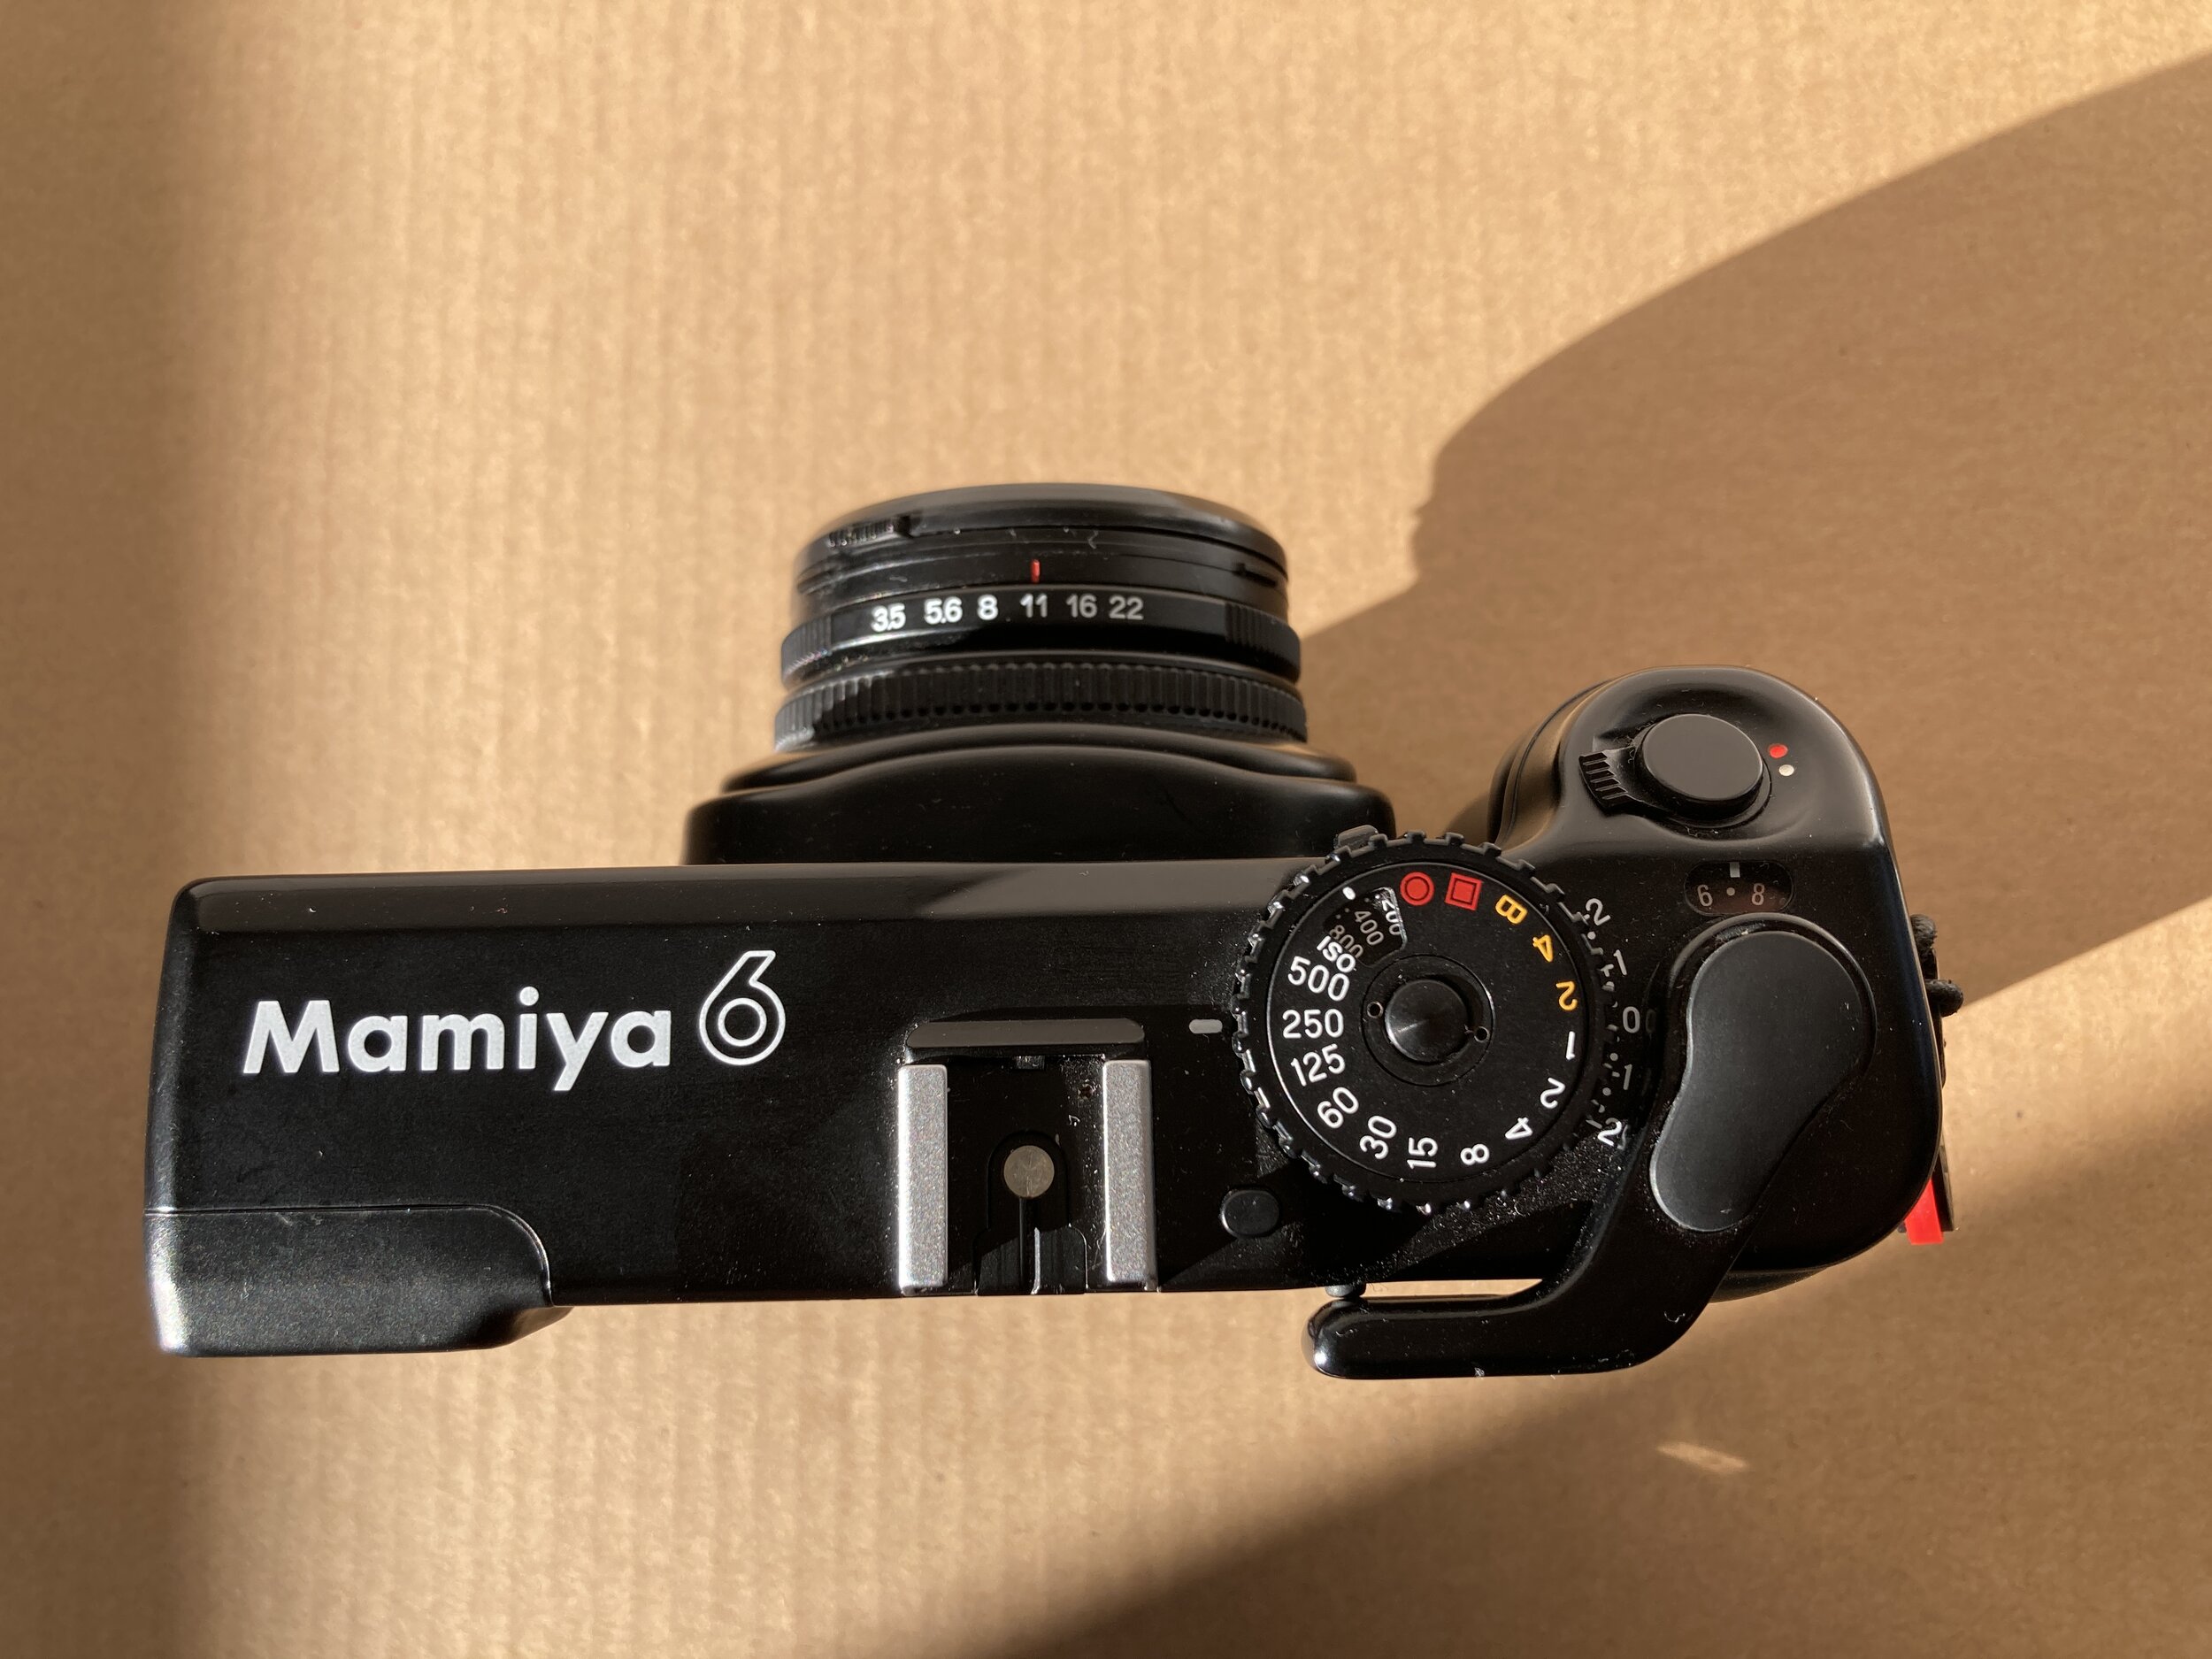
Mamiya 6 - stored position. If the lens is retracted, I know that the lens cap should also be on and I’m not ready to shoot.
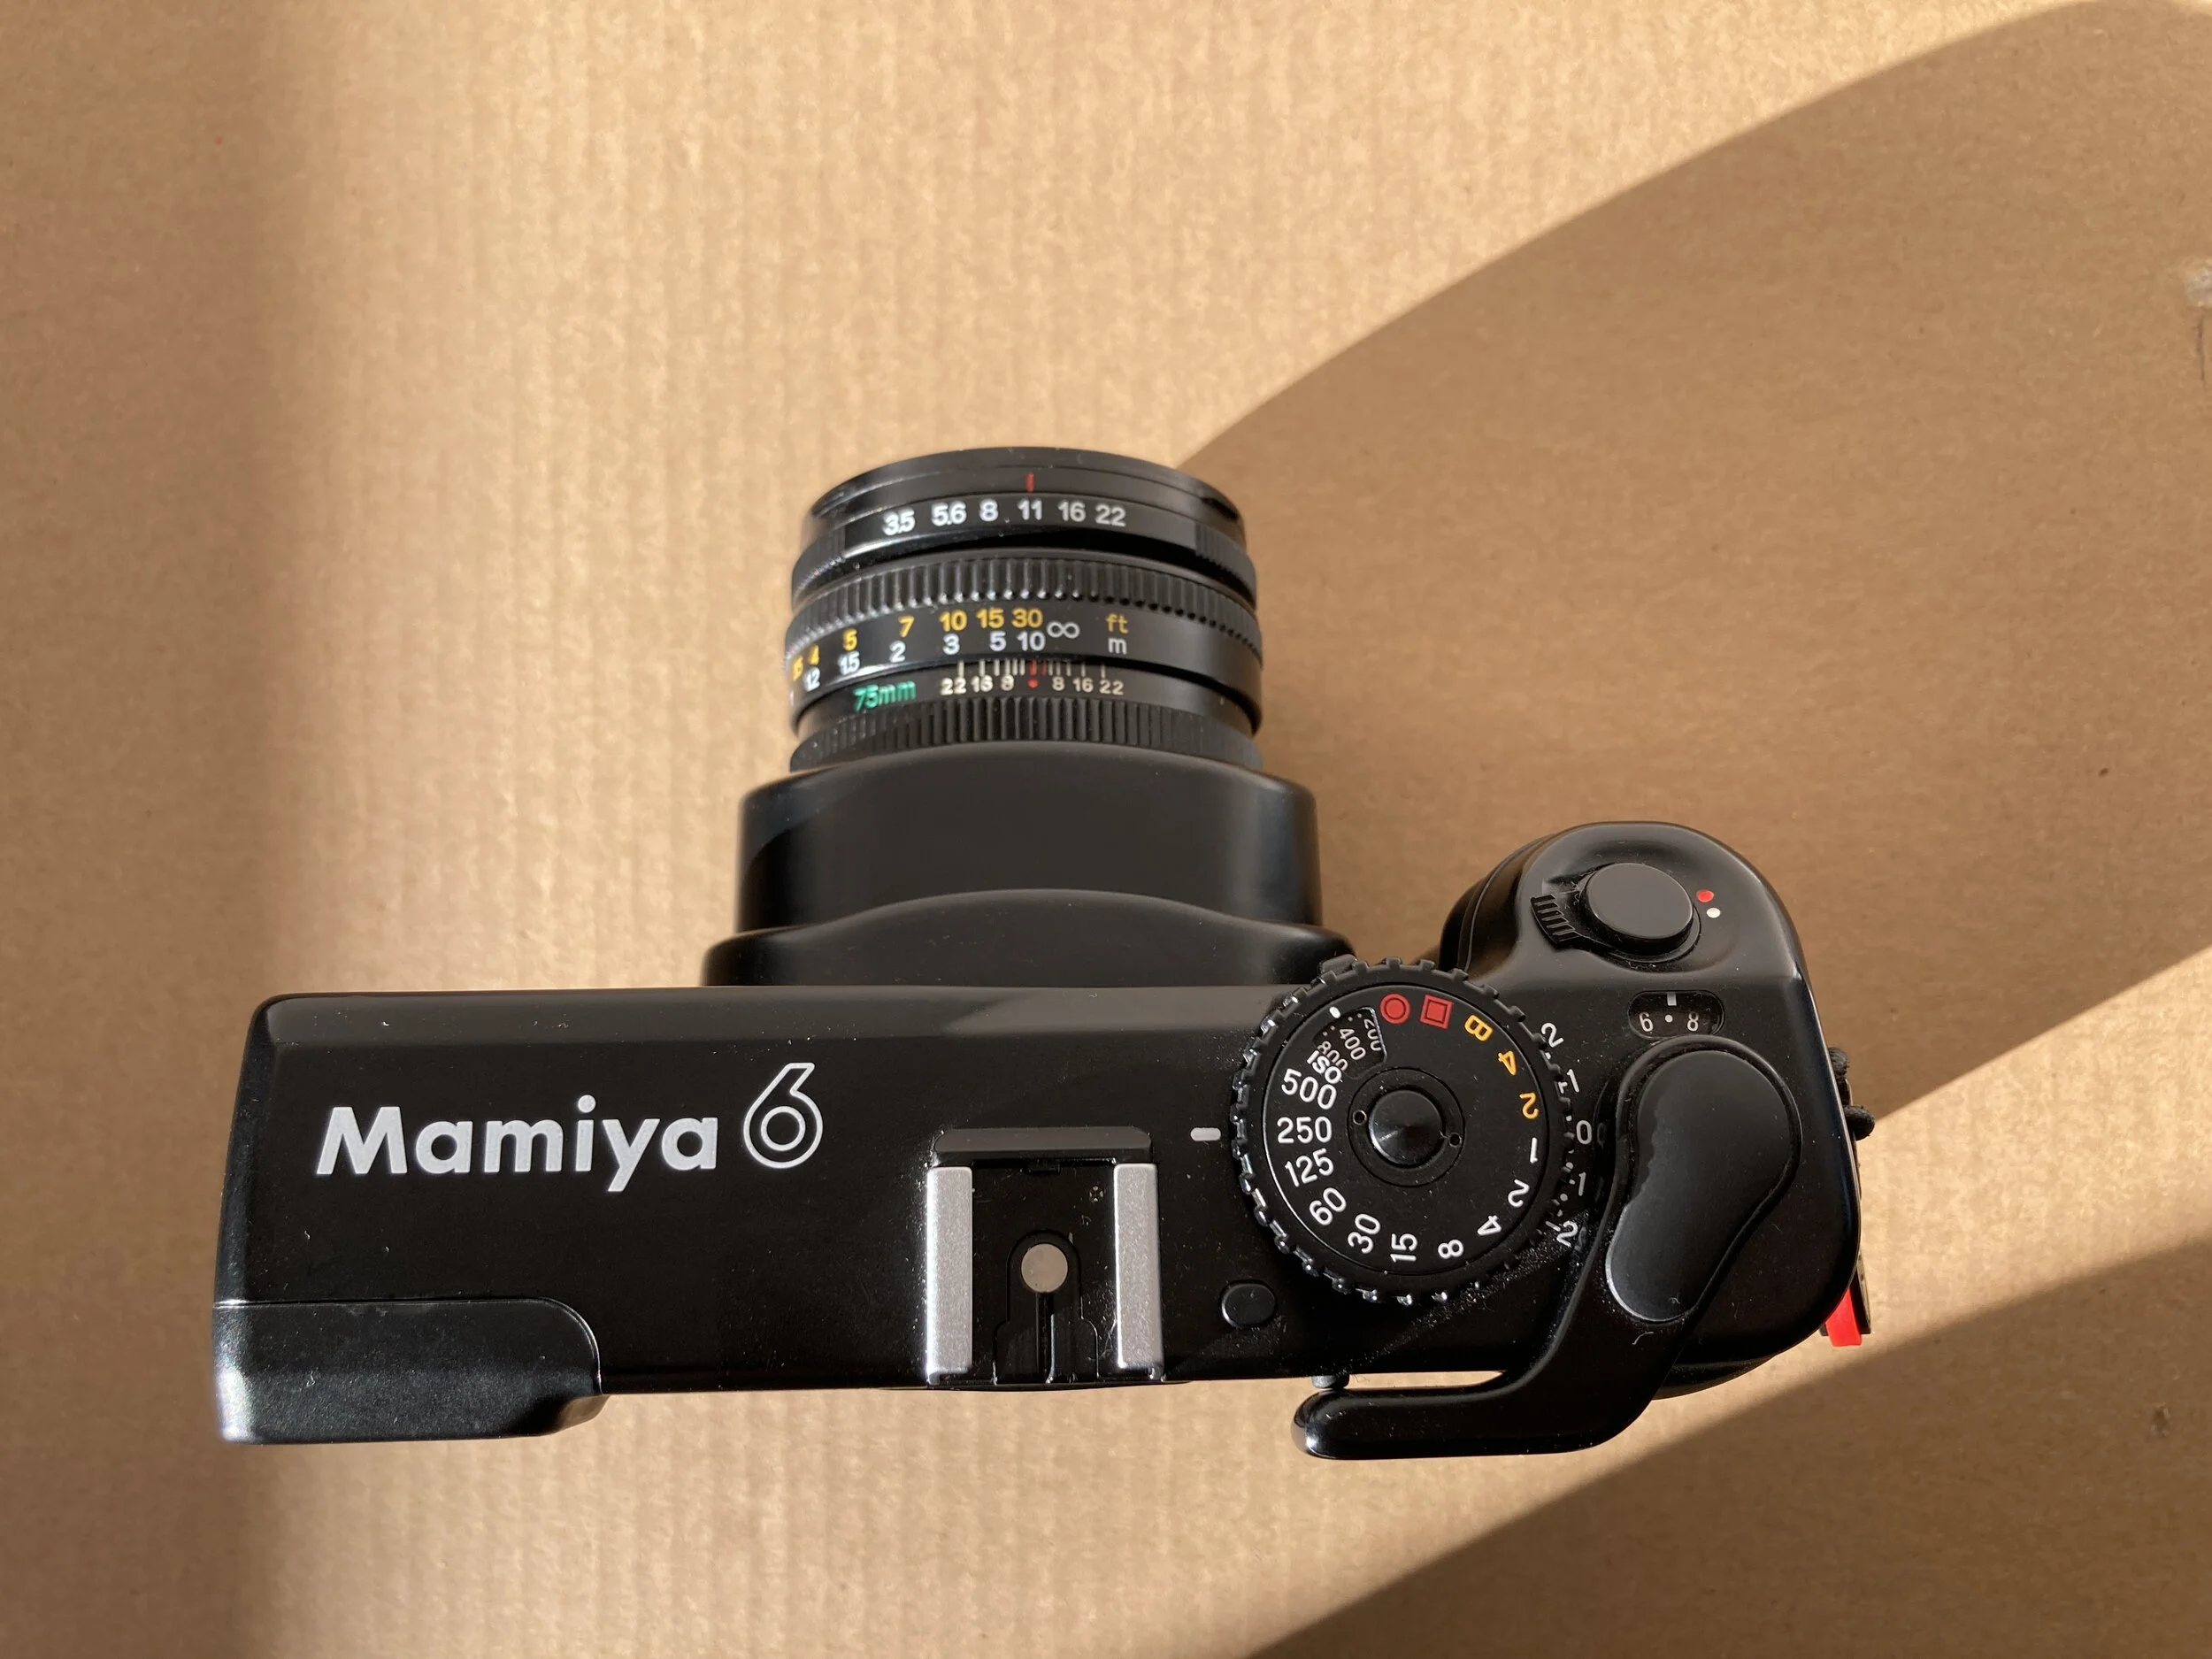
Mamiya 6 - active position. Getting the camera to this position means that I would have already removed the lens cover in the same motion as expanding the bellows. What this tells me is that any time I see the camera in this state, it should be ready to shoot.
Metering and Reloading the Mamiya 6
The Meter
I’ve found the meter to be trustworthy. It’s not a true spot meter like the Mamiya 7ii, but it’s definitely center-weighted - though bright skies can fool it. It’s important to understand that the camera shutter and lenses only offer full stop increments, which creates an almost comical situation where the meter blinks “overexposure”, so you close down a stop, then it starts blinking “underexposure”. Since there’s no official middle ground, I recommend erring on the side of overexposure as negative films can certainly handle it - up to 7 stops if you’ve seen Kyle McDougall’s exposure tests.
However, there’s another way to find that sweet spot, and that is by landing between stops on the lens.

Though there won’t be a click, there’s enough room to land in between stops on the 75mm lens for the Mamiya 6.
Lens Full Stops
Although the lens only offers clicks in full stops, you can manually adjust and land in between stops. You just won’t have a click. The camera’s meter actually recognizes this half-stop adjustment since it meters through the lens. This is a way to satisfy the camera’s meter (and bring yourself peace of mind) when the camera can’t figure out if it wants to be over or under a stop. You’ll know you’re successful when the shutter speed is no longer blinking.
It’s also worth noting that unlike digital cameras and SLRs who close the aperture at the time of shooting, the aperture is fully mechanical and coupled to the lens as you adjust it. This means that if the dial is at f/8, your lens aperture will physically be at f/8, much like a fully manual lens. This is why the “half stop” trick works. Note that I only have the 75mm lens, so I’m not sure if other lenses leave the same distance.
Ending a roll
Understand that if you complete a roll of 120 film, the camera will shoot frame 12, but when you advance the lever, it will advance the frame counter to 14 instead of 13. This can lead to confusion - “Did I shoot a frame 13 that won’t actually be on the negative?” - the answer is most likely no, if you’re certain that you shot frame 12 and landed on frame 14. Simply advance without worry.
Reloading a roll
This is an area where some people have a preference, but I’ll share my process. As you may have gathered, consistency is vital to me. I don’t get a lot of opportunities to go out on trips, so if I’m shooting film I want to remove every humanly possible chance for error. One of these ways is in my reloading process. It starts out fairly standard:
Close the curtain
Remove the spent film, seal it up and store it in a dark bag
Remove the paper entirely from the new film, load it up, lock it in place, and position the take-up leader into the empty spool.
Where I differ is with advancing the film to the starting position. Most photographers will use the advance lever until they line up the arrows, then close the back. The advance lever at this time may only be halfway advanced, and then once that back is closed they will complete the advancement of the frame, followed by a few more advances until they’re at frame one.
I don’t do that. What could happen, though rare, is that your negatives could start either too early or too late on the roll of film and result in a cut-off frame at the end. Again, though it’s rare, if your camera has inconsistent framing issues and might require a tune-up, this makes it more common.
What I do instead is strive for consistency:
I advance the film using full strokes of the lever, generally about 2, until I see the arrow start to come up.
From there, I stop using the advance lever. I use my thumb on the take-up spool to manually wind the film until it’s spot-on in alignment with the arrow and marker.
It’s at that point that I close the back and use the advance lever again to get me to frame one.
Finally, I’ll re-open the protective shutter curtain, where it’ll stay open until that roll is done (or I’m changing lenses).
This ensures that my film always comes out with about an inch on either side of the first and last negative. So even if my camera were to start acting funny, I would have a better chance at not cutting off frames. In addition, this ensures that labs don’t inadvertently damage a frame if there’s an image too close to the end of a roll and they decide to (stupidly) hang up the negative from that end. Trust me, I’ve seen a lot.
If you’re a photographer, which, hopefully you are if you’ve gotten this far, you’re probably more of the visual sort. So if you’d like to see a video that better explains these tips, let me know in the comments. Otherwise, here are a few more sample shots from the Mamiya 6.

White Bluffs, WA, 2020. Mamiya 6 and Kodak Portra 400.

Washington State Capitol, 2018. Mamiya 6 and Ilford HP5+.

West Seattle, WA, 2018. Mamiya 6 and Kodak Portra 400.

Paradise, Mt. Rainier, WA, 2020. Mamiya 6 and Kodak Portra 400.